Here's a little DIY just in time for Valentines. I feel so schmaltzy making a Valentines themed DIY, but I've actually gotten into the Valentines "spirit" as it's my first Valentines with my lovely guy. I've become lame and schmaltzy, I guess. Don't judge me!! And enjoy the DIY!
 
Firstly, supplies you will need:

- Arcrylic paint
- Clear Nail Polish
- Sheer tights (anything from 10 to 30 denier is best, mine are 15)
- Paintbrush (forgot to include that in the photo there... but very necessary!)
- Scissors
- Cardboard (can be from anywhere, an empty ceral box etc)
- Sticky tape (also forgot to include that in the photo...) - Lots of time is also required (DIY not for the impatient)
Next, make your stencils:

Draw one large love heart and one small love heart (or however you'd like to do it, maybe several sizes, or maybe only one? I'm not here to tell you exactly how you must do these things.) onto two squares of cardboard, then cut them out. Seal up the bit where you cut into it with sticky tape.
Next, put on your tights and place the stencil on your leg, wherever you think it'll look nice. Paint thickly, filling out the stencil. Make sure the layer of paint is fairly thick, but not goopy. You can then remove the stencil and fix up any edges that look a bit dodgy with the paintbrush. Now do as many of these as you like on the FRONT of your legs. Have a look in the mirror (while trying not to move your legs too much, and avoid bending your kness - walk around like a robot if you have to) to make sure the placement looks good.
When you're done the fronts of your legs, use a blowdryer on each heart for about 20 seconds to speed up the drying process. It's very important that you don't begin the next step until the paint is BONE DRY.
Next, paint over each heart with clear nail polish (in a thin layer). If paint is coming off and going into the nail polish, you have rushed it. WAIT UNTIL IT IS DRY.
Next, use your blowdryer again, or wait for a loooong time if you have the patience. When you can touch each heart and it doesn't feel at all wet or tacky, you are ready to take your tights off.
When taking your tights off, peel very carefully around each painted heart. If there is any paint left on your legs (other than a faint outline), STOP. It is not dry enough, and it won't work. Chill, sit back down, and WAIT another 5 minutes or so (I can't stress this enough).
Once you take the tights off, turn them around and put them on backwards. Begin process again.
Now you're done! Whether you're a single lady or spending valentines with a beloved, you will surely enjoy your sweet looking legs.

Wishing you all a super lovely day,
 |

Sunday 5 February 2012
DIY Heart Print Valentines Tights
Tuesday 31 January 2012
DIY Patterned Tights

Hello! Another day, another DIY. It almost seems like that anyway – today’s are
these Miu Miu inspired patterned tights. Me and my friend Clare had a chill craft afternoon, and ended up with paint stuck
all over our legs, but it was well worth it. I'm going to be making more of these, using different stencils. I'm thinking jellyfish for one, and daisies for another :)
For these, I followed the DIY on the Haute Pursuit's blog, but added my own step - you should make & use stencils. This will make sure you get the right shape, and you don't have to worry if you're not great at hand painting or lack any kind of skill with a steady hand (like me).
Another tip - DEFINITELY don't take off until COMPLETELY dry. Very important.

Here's some photos of my outfit!
.jpg)  
Wearing:
Skirt - Temt
Bag - Oasap.com
Belt - Vintage
Tights - DIY
Shoes - Rubi Shoes
Blouse - Chicabooti
Have a beautiful day,
Annika xxx
|
Monday 30 January 2012
Mint & Bubblegum


.jpg)


My outfit today is a clash of the 60s and 70s, with my 1960s style
leather bag from oasap.com and my many bows, combined with this amazing
vintage dress from the 1970s. Until my hair is re-blued, I’m sticking to
pastel greens and pinks. (I actually really like it as a colour
palette, it’s very spring-like, no?)
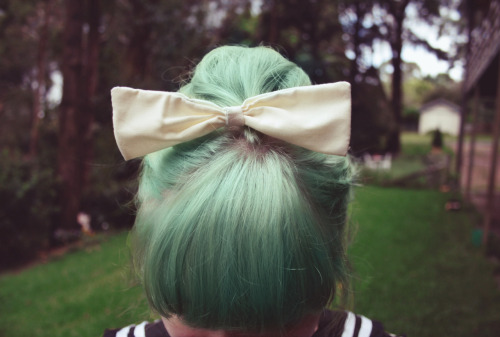
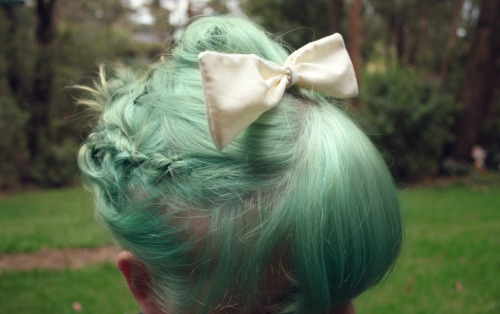
My hair bow I also DIY'd: after I hemmed my dress shorter, I used the left-over fabric to make some hair bows. So my hair bow and dress match!

Wearing:
Dress - Vintage
Bag - oasap.com
Blazer - Vintage
Belt - Vintage
Hair bow - DIY
Shoes - forever21.com
Socks - Tutuanna

LOVE!
Annika xxx
Sunday 29 January 2012
My Blue Hair
Just a quick photo of my hair, when it was nice!
It lasted like this for about 2 days before going green.
Advice: don't use manic panic's atomic turquoise if you want pastel blue hair.
Advice: don't use manic panic's atomic turquoise if you want pastel blue hair.
Ah well.

Saturday 28 January 2012
Pastel Green Garden

Okay. So with all my bragging about how easy it was to get pastel blue hair.... well HAHAHA on me: it's gone green. Still, I don't hate it, and it's gone quite a nice pastel green at least, not seaweed green or oscar the grouch green or baby-poo green. At the very least. Anyway, this week I'm going to try bleaching it again and then mixing Turquoise hairdye with Blue hairdye and see what happens.
I paired my green hair with an amazing pleated pastel skirt that I bought in Tokyo. Isn't it pretty? Also, I got this lovely bag vintage as well, for $5 in Salvos, just yesterday! And it fits my camera - no more ugly red (and practical) camera bag for me! Hooray!


Wearing:
Blouse - Wholesale-dress.net
Skirt - Vintage
Belt - Vintage
Bag - Vintage
Hat - Wholesale-dress.net
Shoes - Forever 21
Tights - Forever 21
Necklace/Pocketwatch - Wholesale-dress.net
And a lovely collage of this outfit, of course:

All my love!
Annika xxx
Monday 23 January 2012
How to Dye Your Hair Pastel Blue - DIY Adventures in Bleaching and Hairdye
(Click here to find the DIY for pastel PINK hair.)
Hello, everyone! I wanted to share with you all my DIY pastel hair experience. While I am not a hairdresser, and have never bleached anyone's hair but my own, I am well experienced in home hair dying and bleaching (I'm pretty sure I haven't seen my natural hair colour since I was 12 years old) and have had black, brown, purple, red, very bright red, bright blonde, orange (and a particularly intriguing combination of red, black and blonde when i was experimenting with terrible hair in my 15 year old scene kid days) hair. I never go to the hairdresser. I have never had pastel hair before, so I am also by no means an expert, or even really very experienced on this either. So don't use this DIY as absolute gospel, and you think if I've got things wrong or it sounds silly, you can ignore it or go to your hairdresser for advice instead, but by all means use this as a guide to help or inspire you if you're trying to achieve pastel (particularly blue or turquoise) hair.

OKAY, disclaimer over, this is how it's done.
Phase 1: The bleaching phase. This is the scary part. Bleach has to potential to melt and fry and burn off your lovely locks. If you're hesitant, get it done at the hairdressers. Or if you're silly like me, do it at home! But do it carefully. You need to do this right so that you don't kill your hair, and if you have hair that is any darker than medium blonde, expect it to take a few weeks and at least 2 bleaches. Hide yourself away from everyone you know, like I did, by conducting the first phase of bleaching on holidays, where I wasn't going to see anyone important (or anyone who would laugh at me) for a week.

Hello, canary yellow!
For this first step, I used a bleaching kit, Schwarzkopf Nordic Blonde "Ultimate Lightener L1++".
This is some pretty serious bleach, designed to lift your hair colour from 6 - 8 shades. It also has a blonde toner in it, so you don't go as yellow as you would otherwise if you were just using developer and powder bleach. I highly recommend it, it did a fantastic job! I went way blonder than I had expected, as I was starting on a pretty dark dyed brown. Before bleaching, make sure you DON'T shampoo your hair for at least a day, and let it get nice and greasy, or your scalp is going to HURT a LOT. The chemicals in your greasy hair will protect the skin on your scalp :)
START BLEACHING on the ends of your hair, working your way up. DO NOT apply any to the roots until the last 10 - 15 minutes of the bleaching process (I did this, and look how blonde the roots still went!) The bleach will work on your roots really quickly because of the heat raditating from your scalp at this level. The bleach should not be on your hair for any longer than 45 minutes. Really. Your hair will melt off.
Wait a week or two, and bleach again!

**NOT BLONDE ENOUGH**

**BLONDE ENOUGH, BUT COULD GO EVEN BLONDER**
(If you still have dark yellow bits, or it looks like this, you'll need to wait a week or two, then bleach AGAIN. You probably won't get a nice pastel blue if you dye over this.)

You need to wait for at least a week before redoing the whole bleaching process. In this time, you need to be looking after your hair (no straightening or blowdrying) and doing some serious deep conditioning treatments. You can deep condition your hair using regular conditioner, by applying it to dry and hair and whacking it up in a shower cap for 20 or so minutes, then washing it out. Do this a few times between bleaches. And don't bleach again until your hair feels soft and healthy.
For the second bleach I used Schwarzkopf Nordic Blonde "Extreme Lightener L1+".
I figured that I didn't want to go a whole another 8 shades lighter (and less damage to my hair, hopefully), so this bleach kit, while still extremely strong, is only designed to lighten your hair 5 - 7 shades. It's also got a blonde toner, so you avoid the yellowness just a little (but be warned, it WILL still go yellow).
Same again for the bleaching process: start at the ends and work up, leave it for 30 minutes, THEN apply the rest to your roots, leave it on for ten more minutes, and then wash off.

Use a silver/blue toner to get rid of the yellowness. I used Schwarzkopf's LIVE Colour Silver Toner. I did this so that my hair would be less yellow when I put the blue in, because blue + yellow = green, and I didn't want entirely green hair.
When can you do this? Immediately after bleaching! Or you can wait however long you would like. This step will not hurt your hair.
Now.. to go turquoise...?

or pastel blue?

After bleaching, you can then begin dying immediately!
Final product #1 - PASTEL TURQUOISE - To achieve this turquoise pastel colour, I used 1/4 Manic Panic Atomic Turqouise with 3/4 conditioner (I think I ended up using 150ml of Conditioner mixed with 50ml of Hairdye) and then left it on my hair for 6 hours in a shower cap after making sure it was throughly worked through. Manic Panic dye will not hurt your hair, and with all the conditioner you're probably doing more good than bad to your hair in this step. You can leave it on as long as you like. Leave it on for AT LEAST an hour if you're in a rush, but if you only leave it for this long, it won't end up as vibrant.
**UPDATE** So, Manic Panic's Atomic Turquoise will eventually (like, after 2 washes) go more like pastel green. At least it did on my hair. If you don't want this, try a less greeny-blue colour, like Directions Atlantic Blue or Lagoon Blue.
Final Product #2 - PASTEL BLUE - To achieve this blue pastel colour, I used 2% (a small spoonful) Manic Panic's Atomic Turquoise mixed with 8% La Riche Directions Atlantic Blue, and 90% conditioner. I can't even comprehend how ridiculously vibrantly blue your hair would be if you used Atlantic blue undiluted, because my hair ended up pretty vibrant, even though the mixture I used was so diluted! Make sure you make at least 200mls of mixture, perhaps more if you have long/thick hair. Work the colour throughly through your hair, and put in a shower cap. Leave it on for a few hours, at least 2 or 3, or for up to 6 like I did. Then rinse and enjoy!
More on maintaining your pastel colour to come...
And to see my new pastel pink hair colour, check out my more recent blog posts. I will try and post a DIY on obtaining pastel pink hair real soon, but it does basically follow these steps, concluding with using a pink rather than a blue dye (obviously).
I hope this post has helped someone out there :)
Have a super lovely day, everyone!
Annika xxxx
Subscribe to:
Posts (Atom)