
I've been having a lot of fun making satchel bags after I figured out how to make them back in this post. This one was slightly different, so if you want full instructions go here, but here's the little summary of this DIY.

1. Get your fabric. Mine was a weird old heavy canvas jacket. 2. Make two identical rectangles. 3. Make two side-strips and one bottom-strip. 4. Join them all up into a pouch. 5. Make a front-flap (using different fabric for the front of the flap) and attach it to the back of the bag. 6. Place your belt on your bag and sew it securely onto the front flap. 7. I then used a pocket from the coat and put it on the front of my bag so it had an extra embellishment. 8. I added a strap which was just an old fabric belt. But you could make a strap by cutting a strip of fabric, folding over and sewing the raw edges together, flipping it inside out and then sewing it onto the sides of the bag.

Good luck to anyone who gives making a satchel bag a go, and please email me a photo if you do!
xx Annika
|

Thursday 26 July 2012
DIY Satchel Bag #2 - Using one belt
Tuesday 24 July 2012
Bright Pastels
   
wearing
blouse - Paper Scissors
sweater clips - DIY
bag - c/o Wholesale
hat - c/o Wholesale
jeans - Unknown (a store in Sydney...)
socks - Vintage
shoes - Dr Martens
I'm an assortment of pastel colours. And wearing pants. What now - pants?
So today I made a second satchel bag, ya'll see it in my next post ;) (or if you follow my instagram (@littlepineneedle) then you would have seen a sneak peek of it already). Thanks heaps for your encouraging comments on my other DIY satchel bag! One more week to go until I'm back at uni so I'm sewing like a mad woman trying to cram in all the things I wanted to get done. I also attempted to make swimmers from a t-shirt last night.. haha and that was pretty much a failure. If I never show all these failed attempts at projects with you guys though, you'll all keep thinking I'm a sewing whiz who can do no wrong, so I won't show you that ;)
xxx Annika
|
Monday 23 July 2012
DIY Satchel Bag/Backpack
So here's what I made:      
wearing
dress - c/o Oasap
bag - made by me!
tights - c/o Oasap
shoes - Vintage
hat - c/o Wholesale
The colour inspiration for this bag came from this Dangerfield coat:

(source)
Which looks a lot nicer in real life than in this photo, and shall one day be mine. I probably never would have put dark-ish green and brown together if it weren't for seeing this coat the other day.
I also took photos of the process so I could attempt to explain how I made it. It was fairly difficult so I recommend you only try it if you have some sewing experience. Here we go!:
what you need
.jpg)
note: your fabric needs to be thick-ish (i used velvet.)
the belts should be near-identical (mine are just from a charity store, this is a good place for cheap belts)
what you do

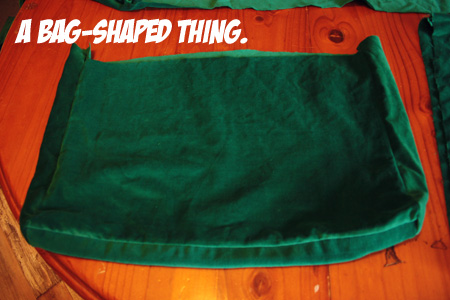
Cut two identical rectangles out from your fabric. This will be the front and back of your bag.

Make a strip of fabric for the bottom of your bag. Make it at least two layers thick so that the bottom of your bag is strong.

Sew it onto the bottom of one of your rectangles (the two materials facing each other).

Sew your other rectangle to the opposite edge of the bottom strip.

Make 2 side strips (the same width as the bottom strip) and sew them onto both sides of the main front rectangle.
Sew it all up into a bag-shaped object!
Now you need to cut out one rectangle of cardboard to the same size as the front of your bag (but this is terrible and you should probably actually use iron-on fusible interfacing instead). This will help give the bag shape. Insert it into the front of the bag.

Cut out a rectangle of fabric of the same size. This will be your inner lining (it'll go over the cardboard).
Flip your bag inside-out.

Place the cardboard inside the front of the bag. Trim it until it fits. Place the lining over the top, then hand-stitch it to the edges of the bag.
 
Make your front flap by cutting out another 2 rectangles (they need to be the same width as the main rectangles but slightly shorter in height, and with rounded edges at one end). Sew them together first (so you have a kind of pocket), then sew this flap to the back edge of the bag.

Use craft glue and thread to attach the straps the the front flap of the bag.

Wrap the belts around the bag, then open up the bottom of the bag (at the back) where the belts need to go inside by flipping it inside-out and cutting the threads. Insert the belt then sew it back up over the top of it.
If your belts were long enough (only one of mine was so I had to use a third belt) then cut off the ends of the belts and do a similar thing to before, but insert them into the bottom of the bag at the front of the bag.
And that's it! I think I will also add a handle to the top and try and make straps for the sides (using another belt - I have so many of these belts, it's a little insane).
I hope you enjoyed this DIY! Can't wait to hear what you think of it!
xxx Annika
|
Friday 20 July 2012
DIY: Circle Skirted Dress

Update: I have uploaded much better instructions for making these dresses here.
I'm going to show you today how I make my circle-skirted dresses. These are pretty easy to make, which I suppose is why I've made so many of them! For example, here's four of my circle-skirted dresses below (and they're clearly fun to swish around in too): .jpg)
I'm not going to go through all the steps of the actual construction of the dress, because it would be a monstrously long post (and I'm pretty sure no one would bother reading it all the way through). I am, however, going to show you the main steps I go through in order to construct a circle-skirted dress, in hope of inspiring budding sewers (you will need basic sewing knowledge to do this, i.e. it's probably better if you've made a shirt/skirt before) to give dress-making a go, because this method takes the two easiest parts of making a dress and mashes them together.
Basically, making this style dress consists of using any kind of cheap vintage store dress pattern to get a bodice and joining it up to a circle skirt! If you want to know what goes on in the making of these dresses, then read on...
what you need
1. a pattern whose pattern pieces for the bodice are separate from the skirt

3. sewing equipment
4. a zipper of about 35cm length 
Making your bodice


Now you have a bodice. Iron flat the seams and the interfacing. Then put it aside and begin on your skirt.
 So I don't have to put all the steps here again, follow this tutorial I wrote for making a circle skirt, but stop just before the waistband-adding part. (The material need not be velvet, either. Use any fabric you want.) Then come back here. 
Attaching the skirt to the bodice
This part seems a little bizarre at first but it works!
Turn your bodice inside-out.
Slide it over your skirt upside-down (skirt needs to be facing up and not inside-out).
Pin together. If the bodice is too wide for the skirt, take it in at the sides until the two are just about matching in circumference. (Your skirt should be perfect for your waist measurement if you measured it right.)
 
Sew together with a normal straight stitch. Don't sew over the top of the zipper - but go right up to the edges of it.
Turn the right way around and BAM! You now have a dress (if all went well!)
Summary: Make bodice from a pattern. Make circle skirt. Attach the two.
Oh man. That was actually probably completely confusing. If these instructions make sense to anyone, you're probably a genius, because I'm pretty sure they're really too stupidly convoluted. Well... enjoy anyway! If all else fails you can skim through the pictures and pretend you're reading a comic book about a sewing superhero.
Update: I have uploaded much better instructions for making these dresses here.
Hope you all have a marvellous weekend!
xxx Annika
|
Mint & Honey
.jpg)    

How's it going, guys? So I mentioned yesterday that I'd gone on a fabric-shopping spree to stock up on some pretty materials. This is what became of two of the fabrics I bought.
I also said I'd take pictures and attempt to throw it all together in a DIY. Well that post is coming in a couple of hours, so come back in a little bit if you're keen!
wearing
dress - I made it
necklace - Stolen off boyfriend
tights - c/o Oasap
belt - Vintage
hat - c/o Wholesale
shoes - Rubi shoes
bag - Vintage
Thank you as always for your lovely words on both the things that I make and the outfits I throw together. It means a lot, and inspires me to keep doing what I'm doing here! Just thought I'd let you all know, I really appreciate it.
xxx Annika
|
Thursday 19 July 2012
All Is Love / Lilac

  
wearing
blouse - Paper Scissors
sweater clips - DIY
shorts - DIY
tights - c/o Oasap
bag - c/o Wholesale
hat - c/o Wholesale
shoes - Raben footwear
I just went on a mad fabric-shopping expedition in Marrickville (the best place for cheap, awesome fabric, if anyone from Sydney is reading this and is interested) and bought some really pretty minty polka dot material plus this gorgeous honey-coloured material. The two are going together to make the prettiest dress ever. And I will actually try to document the process photographically this time!
It's almost the weekend! I hope you're all having a beautiful Thursday.
xxx Annika
|
Subscribe to:
Posts (Atom)